So you installed a game you’ve been waiting to play, and when you try to launch it, you’re met with error codes like “D3DX9_43.dll is missing” or “DirectX encountered an unrecoverable error.” Frustrating, right?
⚙️ Common DirectX Errors and What They Mean (tap to expand)
| Error | What It Means | Solution |
|---|---|---|
| “D3DX9_43.dll is missing” | DirectX 9 component missing, needed by older games. | Re-run the DirectX Web Installer to add legacy DirectX files. |
| “DirectX encountered an unrecoverable error” | Game/app can’t communicate with DirectX due to incompatibility. | Update your graphics card drivers and ensure Windows is up to date. |
| “The program can’t start because d3d11.dll is missing” | Missing or corrupted Direct3D 11 file. | Install or update DirectX 11 via Windows Update. |
| “DXGI_ERROR_DEVICE_HUNG” | GPU became unresponsive during DirectX calls. | Reset overclocking, update graphics drivers, lower graphical settings. |
| “The DirectX installation has failed” | DirectX installation was interrupted or corrupted. | Run the DirectX Installer as an admin and install all Windows updates. |
| “dxgi.dll is missing” | DirectX Graphics Infrastructure file missing or corrupted. | Run System File Checker (sfc /scannow) or reinstall DirectX. |
| “DXGI_ERROR_DEVICE_RESET” | DirectX device (GPU) was reset by the system. | Update GPU drivers, lower game settings, and check power supply stability. |
| “DirectDraw Error” | Older error related to 2D graphics rendering in DirectDraw. | Run the game in compatibility mode or adjust DirectDraw settings. |
| “dxgi_error_invalid_call” | Communication issue between game and graphics card. | Update the game/app and ensure DirectX and drivers are up to date. |
| “D3Dcompiler_43.dll is missing” | Missing or corrupted Direct3D compiler file. | Reinstall DirectX and update Microsoft Visual C++ Redistributables. |
These errors usually mean your system is missing a crucial part called DirectX. But what is DirectX? DirectX is a set of APIs (tools allowing software, like games, to communicate with your PC’s hardware) designed to make sure your computer can handle high-quality visuals and sound in games or multimedia software.
Luckily, installing DirectX is simpler than it sounds. In this guide, I’ll show you the steps to get it done.
📝 Note: How to Check if DirectX is Already Installed on Your PC (tap to expand)
Before you install DirectX, keep in mind it might already be installed. Many Windows versions, especially newer ones like Windows 10 and Windows 11, come with DirectX pre-installed. This means, in most cases, you won’t need to install DirectX manually. However, it’s important to check first.
Here’s how to check if DirectX is installed and which version you have:
- Press Windows Key + R to open the Run dialog.
- Type dxdiag and hit Enter. This will open the DirectX Diagnostic Tool.
- In the window that pops up, you’ll see the DirectX version listed under the System tab.
If you see a version like DirectX 12, you’re all set. If it’s an older version or missing, you’ll need to update or install it.
If you’ve confirmed that DirectX is either outdated or missing, the next step is to install or update it. Fortunately, this process is straightforward.
How to Install or Update DirectX?
- Head to the official Microsoft website and download the DirectX Web Installer from this link.

- Once downloaded, open the installer file (dxwebsetup.exe).
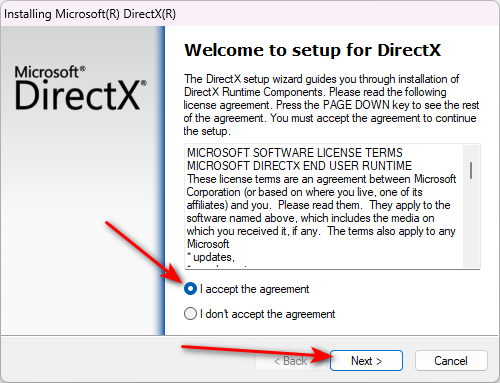
- Select “I accept the agreement” and press the Next button.
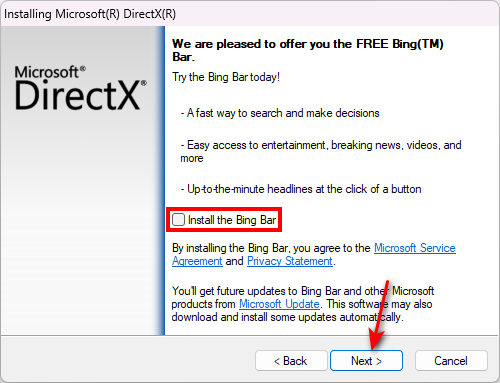
- Uncheck “Install the Bing Bar” option as it’s not needed and press the Next button.
- After the installation is complete, restart your PC to ensure all changes are applied properly.
After restarting, try launching your game again to see if the DirectX-related errors are resolved. If the issue persists, you might need to troubleshoot further.
⚙️ Method: Enabling DirectPlay for Old Games (tap to expand)
Some older games, especially those released before DirectX 9, need a legacy feature called DirectPlay. DirectPlay is no longer used in modern games, but for older titles, enabling this feature can be critical for networking and multiplayer support.
To enable DirectPlay on Windows, follow these steps:
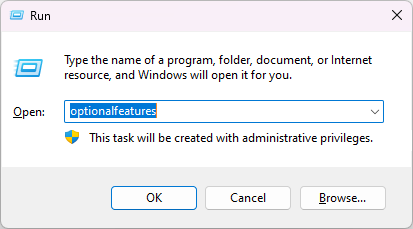
- Press Windows Key + R to open the Run dialog, then type optionalfeatures and press Enter.
- In the Windows Features window, find and expand Legacy Components.
- Check the box next to DirectPlay and click OK.
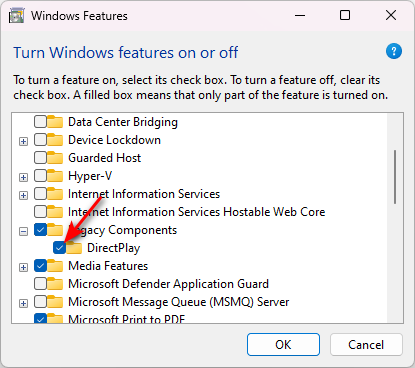
- Allow Windows to install the needed components, then restart your PC if prompted.
After enabling DirectPlay, you should be able to run older games that need this feature. If you’re still having issues, make sure your game is compatible with your system’s other components.
Once you’ve installed or updated DirectX and enabled legacy features like DirectPlay, your games should run smoothly. If you still have issues—especially with older or more demanding games—check other key system dependencies that can cause similar errors.
⚠️ Still Facing Errors? Here’s What to Check (tap to expand)
After addressing DirectX issues, make sure your system has the latest Visual C++ Redistributable packages and .NET Framework. These add extra libraries needed for many games and apps that DirectX alone doesn’t cover.
If you’re still facing game crashes or error messages, it might be due to missing or outdated versions of these components. Many games, especially older ones, depend on them to work properly.
- Visit the official Microsoft Visual C++ Redistributable page and install the latest versions for 32-bit and 64-bit systems.
- Make sure the correct .NET Framework is installed for any older games or software that need it.
Keeping these components updated, along with DirectX, will help reduce errors and ensure your system can handle both new and old games.
Make Sure Your System Meets the Requirements
Besides DirectX, your hardware also needs to meet the minimum requirements for gaming. Be sure your system has:
- Updated graphics card drivers (NVIDIA, AMD, or Intel).
- At least 4GB of RAM for older games, and more for newer titles.
- An updated operating system, especially for newer games.

